I am running the X1 with Debian 12 and it maps uart 1 and 2 to ttyS1 and ttyS2 but they are not usable. Docs say that those uart’s are mapped to ttyS4 and ttyS5 but neither are seen in Debian? It looks like after a few hours of trying; the Debian kernel would need to be re-written! Not cool! Why put them on the board if you can’t get to them in Linux! Is there something I am missing in the bios setup?
Hello.
We don’t have fixed UART number, so the OS may be disordered when recognizing it, for example, ttyS4 may correspond to UART1 or UART3.
You can try to communicate one by one.
Charles, thank you for your reply. The thing is we tried everything.
[ 0.748380] 00:01: ttyS0 at I/O 0x3f8 (irq = 4, base_baud = 115200) is a 16550A
[ 0.749636] 00:08: ttyS1 at MMIO 0xfe034000 (irq = 21, base_baud = 115200) is a 16550A
[ 0.750805] 00:09: ttyS2 at MMIO 0xfe036000 (irq = 34, base_baud = 115200) is a 16550A
[ 1.311340] dw-apb-uart.5: ttyS3 at MMIO 0x4010005000 (irq = 20, base_baud = 7500000) is a 16550A
As you can see the OS sees the three ports and the only one that we can get to works is ttyS0.
Can you confirm that you don’t have any other built in devices or services that maybe already use irg 21 & 34?
We have ensured that dialout permissions are set correctly and manually configured each port correctly:
Tried simple direct loopback: stty -F /dev/ttyS1 115200 raw -echo and still nothing. Since the only information we get from you expressly states that uart1 & 2 translates to /dev/ttyS4 & 5, we even tried to manually create then in Debian. Of course that didn’t work either.
The weird thing is in the bios you have Uart1 disabled by default? We did try enabling it and it end up rearranging the mapped irq’s in Debian but still neither want to work. So, after a few hours we just gave up and decided to just use a series of USB to serial adapters.
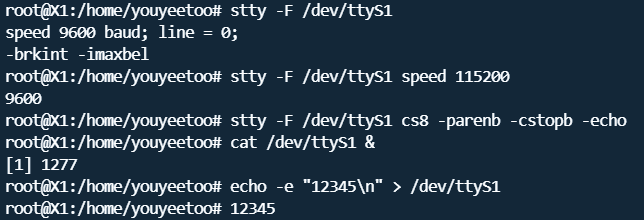
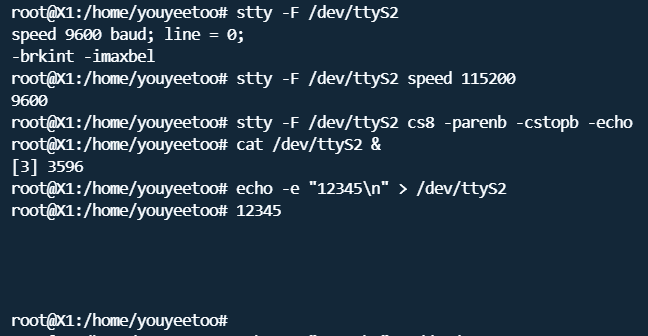
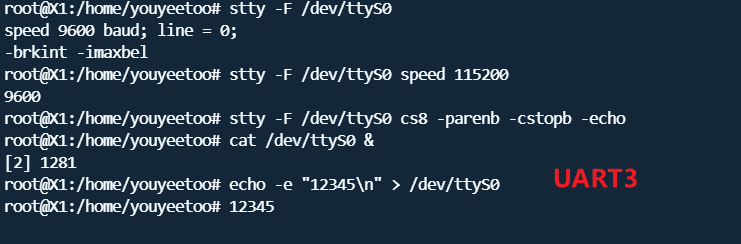
Hello! I verified the problem you described in Debian 12. The three UARTs are normal and loopback tests can be performed. For the hardware part, you need to short the jumper caps between RX and TX. For the software part, just enter the relevant commands. My verification results are shown in the figure. It should be noted that UART3 corresponds to ttyS0! ! ! UART1 and UART2 normally correspond to ttyS1 and ttyS2.
Example command(UART1):
stty -F /dev/ttyS1
stty -F /dev/ttyS1 cs8 -parenb -cstopb -echo
cat /dev/ttyS1 &
echo -e “12345\n” > /dev/ttyS1